Monday, November 30, 2015

DI Chandelier Makeover

Thanks for stopping by! Follow us on Instagram, Pinterest, and Facebook to keep up with our latest projects!
Well…hello friends! It’s has been a long while since I last posted on our blog. I am just grateful to my sister and her desire to share her breast cancer story with all of you while I took a little break. Her story is inspiring. I am grateful for her strength and desire to keep moving forward while going through this difficult and scary time in her life. I am grateful she is still here with us and I love her. =-)
A few weeks ago I posted some pictures of a small chandelier I found at DI. My friend Allysun saw it first; she was thinking it would look good in her living area, but after a few minutes of pondering she decided it did not really fit the style she was going for. That’s when I jumped in and said “Are you sure you don’t want it? If you don’t I will take it!.”  “Go for it.” – she said. A few minutes later this young mom saw me holding my great find and told me how lucky I was that I had found such a treasure. She had been looking for one for a long time, but her son had to go to the bathroom, and when she came back this awesome find was hanging from my left hand. Mmmmmm…should I have given it to her? Now that I think about it I feel kind of bad. Oh well…too late now to feel bad. Note to this mom: when you see something you like at DI, grab it!
I was not really sure what to do with it at first or where I would actually hang it. Initially I wanted to replace the shades, but after searching on the internet I realized these kinds of shades are not cheap–at least not the ones that I liked. Here is a before picture of the chanderlier:
chandbefore
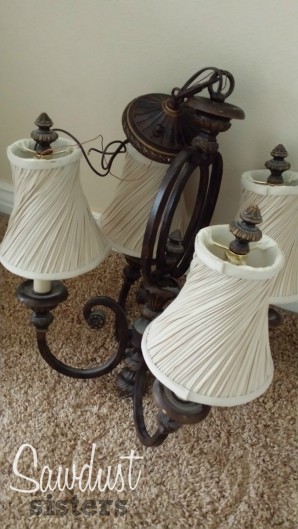
I only paid $10.00 for it, and it is heavy wrought iron. After pondering for a bit I decided I wanted to paint it white and distress it. I thought about doing a glaze over it too, but since the base was a dark brown I could just distress it and have some of the brown color show on all the edges.
I took it to my garage and spray painted the whole thing. I even spray painted the sleeves where the bulbs are screwed into. Make sure you give it several coats and that you cover all the little nooks and crannies. Start spraying it in the position shown (remove shades first, of course) and then turn over. I do the bottom last as it is the area that will show the most once it hangs from the ceiling.
One word of advice – do not buy cheap spray paint. I bought a generic brand that was on sale at Ace Hardware and the paint was horrible – no matter how much I shook the can the paint was still coming out clumpy and gross. I still used it, but then I bought some Krylon spray paint in satin and it was sooo heavenly smooth and steady while I sprayed. So…note to self (and to you!): cheapy spray paint gives you cheapy results (not to be confused with ‘chippy’ – we do want that!).
Once the paint was completely dry, I took a piece of sandpaper (medium coarseness) and went to town distressing the whole thing. I focused on the areas that would normally wear off with the years, like all the edges and some crevices here and there. Some people like a lot of distressing and some don’t – and that’s Ok! Just do enough of it until you get the look that you are looking for.
chandelier4
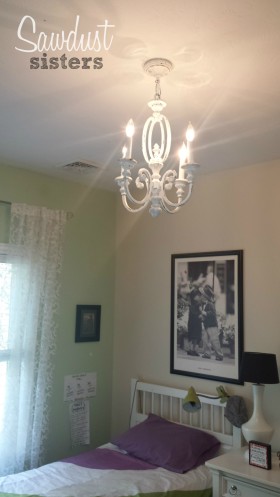
I tried covering the shades with scrapbooking paper, and even though the result was decent, when I put them on I did not like the look. Once I had my husband help me with the wiring and hanging, I decided it looked way better without the shades. It looks classy and dresses up my daughter’s bedroom very nicely.
chanderlier7
Here are some pictures of the end result. We have plans to repaint her whole room and do a different color scheme, and the chandelier will still go perfectly with whatever we choose to do.
chandelier2
Enjoy the pictures! Let me know if you have any questions about this quick and easy project!
chandelier1
chandelier5
See you soon!
-Beverly

DIY Nativity Stable

DIY Nativity Stable

Hello friends! Thanks for stopping by! Follow us on Instagram, Pinterest, and Facebook to keep up with our latest projects!
As promised, I will show you how easy it is to build a pretty stable for your nativity scene out of wood scraps. Are you ready?
stable9
Materials needed:
Wood ( I used plywood from my storage trunk project).
Miter saw
Screws
Wood glue
Chalk paint or stain
Sandpaper
stableparts
These are my 4 pieces of wood already cut. I drilled pocket holes on my two longer pieces deep enough to fit my 1 1/4 inch screws.  I used a Kreg Jig to drill the pocket holes. If you have never used one, don’t panic. This small tool comes with easy to follow intructions and will tell you exactly what to do to get the right depth for your pocket holes. It is all determined by how thick your wood is (mine is 3/4 inches thick). Here are the measurements of my wood pieces:
Right hand square piece – 10 X 10 inches
Bottom left piece – 5 X 10 inches
Top left longer pieces – 3 X 14 inches each
Now, these measurements are based on the size of my tallest figurine. Joseph is about 11.5 inches, and I decided to make the stable three inches taller to make it roomier and more comfortable for them. =-) The top piece is 1/2 the size of the bottom piece. However, it all depends on what you want your end result to look like. I cut the bottom piece first, placed the figurines on it, and then decided the height and width of the side pieces. My nativity is from Hobby Lobby and with a coupon of 40% off I paid $30.00. I bought this back in October, and I am so glad I did! I was there last week and there were no nativities left. Here is what the box looks like:
nativity2
So, let me show how I did this. I attached the side pieces to the base first:
stable1
The top was next:
stable2
And this is the end result ready for paint or stain:
stable3
Don’t forget to use wood glue before you screw the pieces together. Apply the glue where the pieces touch, then screw. It will give you a very sturdy bond. Any wood glue works. You may find it at any craft store.
Ok, now we move on to paint. But first I wanted to stain it as I was planning on distressing the whole thing. I wanted the dark stain to show on the edges. However, if that is not your thing and you want the end result to be a solid warm white, go for it! You can skip the following step.
stable4-bev
I took an old rag, dipped it in the stain, and started applying it. A small amount goes a long way! I used the same stain I have used for many of my projects. It is the Minwax brand in the dark walnut color. You may want to protect the area where you are staining. Put some newspaper or wax paper down for easy clean up. Also, take the time to change into clothes that you won’t care if they get stained.
Note to self: Follow my own advice. =-)
(As a side note, if you are wondering how I hand painted the back wall in my dining room, you can find the tutorial here.)
stable5
My daughter Natalia wanted me keep it like this. I really liked it too, but it would just get lost with all the wood finishes that there are in my kitchen. My buffet is also a dark wood stain, and I wanted the stable to blend with the nativity and to stand out on the buffet. But, if the furniture piece you are placing your nativity on is white or light colored, I would stick with the stain look. It is all about what you have going on in your space.
Unfortunately, I don’t have pictures of my painting process. I got too excited to finish and forgot all about taking more pictures. But, I will explain what I did.
  1. I applied some vaseline in the areas where I wanted the paint to chip off (most of the edges and some random areas).
  2. I painted the whole thing with chalk paint (NOT chalkboard paint) in a warm white. It took about three coats as chalk paint soaks into the wood easily and dries really fast.
  3. I took a sanding block and sanded all of the edges and random areas where I applied the vaseline.
  4. I applied more paint or stain in areas where I thought I sanded too much, and sanded more where I thought it needed it. It was a good 10 minutes or more of touching up, sanding, stepping back to look at it, and touching up again. =-)
stable11
I am pleased with the results! I ended up placing a red runner under it to give it more depth, and added my DIY Christmas trees. I made these before I started blogging – someday I will write a post on how to make them.
stable10
stable12
stable8
The glass lamp is a DI find and I replaced the shade. The snowy branches I bought at a local craft store, and I still have to fill my glass vases on the right with something Christmasy.
Thank you for stopping by! Let me know if you have any other questions.
-Beverly

Tuesday, August 18, 2015

Floor Length Mirror Tutorial

Floor length Mirror Tutorial – No Kreg Jig Required!

Thanks for stopping by! Follow us on Instagram, Pinterest, and Facebook to keep up with our latest projects!
Today I want to share a quick tutorial on a simple way to frame a mirror. This frameless mirror was a freebie from a friend of mine who was moving and did not want to take it with her. It was actually double the width and I had it cut down the middle at this glass shop in town, which gave me two nice and long pieces to work with. The second piece is still frameless. Someday I will get to it…
leaningmirror6
Now that I have shown you the end result, let’s start from the beginning:
leaningmirror2
This is what the mirror looked like once I had it cut. It was a good size for a leaning mirror–all it needed was a nice thick frame!
leaningmirror1
I knew that I did not want to finish the corners at a 45 degree angle, which simplified my project even more since I did not own any tools back when I did this. My wood planks were about 7 inches wide. So….this is probably the best way to tell you how I figured out the length of my four pieces:
Horizontal piece: width of the mirror + (width of wood X 2) – 1/2 inch.  So, if your mirror’s width is 20 inches and your wood planks are 7 inches wide, then your horizontal piece will be 20 inches + 14 inches -1/2 inch = 33.5 inches. You will need to cut two of these.
Vertical piece: Length of mirror – 1/2 inch. So, if your length is 60 inches, then your vertical piece will be 59.5 inches. You will need to cut two of these.
Note: Remember that these wood pieces will be sitting on top of the mirror. The -1/2 inch measurement is the distance from the mirror edge that will be behind the mirror, which when split by half will give you a 1/4 inch distance all around that will sit behind the frame. If you think that is not enough, you may increase this measurement to -3/4 inch or even up to 1 inch. I just wanted as much of the mirror to show once the frame was attached.
leaningmirror4
Once I had my four pieces cut, I actually used glue and a staple gun (Can you see the staples?) to attach them. A Kreg Jig would have been phenomenal for this project, but I made it work without one. Yay! I added glue to where the sides join together, and then I stapled the joints to keep them together while drying. Not as sturdy as when you use screws, but it is sturdy enough. This is a piece that is never moved nor handled for any reason, so the staples and the wood glue worked perfectly fine.
leaningmirror3
Once your frame is fully dried, you may give it a quick sanding and then stain it. I used dark walnut from Minwax. For a tutorial on how to apply stain, search the internet, I am sure you will find one. Lol! Now the fun part–lay the frame right side down, and lay the mirror on top facing down, just like the picture shows. The tricky part about this was making sure that the 1/4 inch distance I accounted for to sit on the frame was evenly spaced all the way around. Once I did that, I went ahead and attached these awesome mirror clips that I got from Amazon. To know what size to get you need to measure the thickness of your mirror. These are to hold a 1/4 inch thick mirror, but they also have some that are 1/8 inch for thinner mirrors. I used 8 of them, two on each corner.
leaningmirror5
I think this mirror looks best when it is just leaning, instead of hanging it like a traditional mirror. You may also distress the edges of the frame a bit with sand paper if you want it to have a more rustic and worn look.
leaningmirror6
So….that’s it. Do you have a frameless mirror laying around somewhere that could use a frame? Go for it, it is not as hard as you may think it is. Let me know if you have any other questions about this project!

How to Build Board - N - Batten Shutters

Hello friends! It’s been a while since I have shared with you another one of my easy projects, so here I am, ready to make your day! These shutters are super simple to make, and even though I don’t have pictures of every single step, I don’t think you will need them. You can make these in 1/2 a day, and once you install them on your bare window and see the transformation, you will wonder why in the world you waited so long to do this! Ready to tackle this? Let’s do it!
Materials needed:
Wood (cedar or pine work fine) – 1 inch thick X 6 inches wide boards. Make sure they are nice and straight.
Nails
Wood glue
Miter saw (or just get them cut at Lowes or Home Depot)
Hinges (optional – link below)
First, cut 6 boards (three for each panel) the length of the window (mine was 60 inches tall). Then cut 4 horizontal pieces (2 for each panel) that are the exact width of what your finished panel will be. To determine the width of your panels, just measure the width of your window and divide by half. My window was 36 inches wide, so each one of my panels ended up being about 18 inches wide. Once I had everything cut I gave all the pieces a quick sanding to make them nice and smooth.
shuttersraw1
Make sure you measure each board since the 6 inch wide measurement is closer to 5 3/4 inches than it is to 6 inches. Once you know exactly how wide your planks are you can then determine the space between the boards, which, along with the measured width of the three boards should match the length of the two horizontal pieces.shuttersraw2 Glue the top horizontal piece with wood glue and place some heavy books on it to keep it from sliding (use clamps if you already have some). Do the same thing with the bottom horizontal piece. The distance from the top and the bottom can vary–you can place the horizontal pieces on the boards before gluing them and then step back to see if it looks good to you. If not, adjust the measurement until satisfied. Keep in mind that the smaller the length of the panel the smaller the distance from the top and the bottom to the horizontal pieces. Mine were about 6 inches from the top and the bottom.
shutters 1
Once the glue dries you can turn your shutters over and nail them from the back for extra sturdiness. Use nails that are no longer than 1 3/4 inches long to make sure everything is well attached. Or you may use an electric drill and screws instead. The reason why I wait until the glue is semi dry to do this step is to keep the boards from sliding on me while I am trying to drill into them. But at the time I did not have any clamps to hold the wood steady. If you do have clamps, you can apply the glue, set the wood pieces where they need to be, clamp them, and then screw from behind.
I used a dark walnut stain from minwax that is gel based. It glides on like paint. It is one of my favorite colors for staining wood. Then I brushed a semi gloss polyurethane on the front and back since these shutters are facing south and will get a lot of sun, rain and snow. I am planning on doing the polyurethane once a year to keep the wood in the best condition possible and for the longest time.
Talking about wood, make sure you get good quality wood. Cedar is a great option if you want to spend a little more.  I bought pine to keep everything low cost. I will let you know how they are holding up after one year of facing the elements! =-)
The hardware that I used I bought from amazon. They are actually plastic hinges! Again, I wanted to spend the least amount of money, and wrought iron hinges, although beautiful, were out of my budget. These ones worked out great and they dressed up the shutters nicely.
shutters 3)
As far as hanging the shutters on the brick wall, that is one thing I did not do. We have a friend who is a contractor and he had the right drill and screws to get it all done perfectly. He spaced the shutters about an inch from the window. I wish I could tell you how to do it yourself but I have no clue! Lol!
shutters 4
Do you have any bare windows that need some dressing up? I hope you liked this simple project and that you are now pumped up to build some yourself. If there is anything you want more detail about please let me know!
Thanks for stopping by.  -Beverly

Monday, May 4, 2015

The Trunk Company - Rexburg, Idaho

I truly have to laugh when I read the title to my post. So far, I have only built two storage trunks--one for me and one to sell. My idea of selling my trunks is very far from being a "company," but I like the way it sounds. I enjoy coming up with catchy names for the businesses I will own and run in the future--like Fabric Crush, or Top-Notch Upholstery. Nothing wrong with dreaming big, right?

As I said in my previous post, I love to work with wood. After having some experience with reupholstery, I can honestly say I will make another trunk before I have to reupholster a sofa. I still love reupholstery, but with woodworking you can go straight into creating--there is no prepping stage. With reupholstery, the prepping stage cannot be avoided. Removing old, dirty, stained fabric and dealing with a million staples adds another step--and not an easy one-- before I can get to the fun part and start transforming a furniture piece. I guess I am just a little impatient, and woodworking gets me to the end much faster than I can with reupholstery.


If you are on the look out for a storage chest/trunk that will serve as a coffee table, or just storage for the end of your bed, stay tuned for a new store in town that will open at the end of this month. My trunks will be sold at this unique store, and I cannot wait for you to see them in person.  
This trunk was built with maple hardwoods and pine. 


Every trunk will be beautiful and different. I will be trying different stains, colors, and hardware to make them special and not the cookie cutter type.  On this particular one I used a custom finish for the stain--dark walnut with some other hand applied colors to give the finish some depth. 


I paid special attention to the handles, back hinges, and front latch. 
It is a beautiful piece.
I almost do not want to get rid of it, but you can only have so many storage trunks in a house 
before it starts to look ridiculous. Lol!


This is a BRAND-NEW item and up for grabs. Nothing old or refurbished was used on this baby. I carefully selected all the wood and hardware to build it just for you. 

So, what are you waiting for? =-)


Woodworking and Plantains

Woodworking has always had a place in my heart. I like the simplicity of just measuring and cutting pieces of wood and how really beautiful things can be created from just assembling those pieces together. Many years ago, Melody Hancock, a good friend of mine from Arizona, shared her woodworking passion with me. We made about 30 plantain smashers (or"tostoneras" for those that are familiar with this term) to give away to family and friends for Christmas. I drew the design and she showed me how to cut, sand and assemble these cute things. If you have never seen one,  I will enlighten you right at this moment:

It is quite the gadget let me tell you. =-) 


This is what you can make with this wooden tool. In Puerto Rico, they are called "tostones." And they are absolutely delicious! Yes, they are fried. There is no going around that my friends. If you want to experience heaven in just one bite, you gotta fry these babies. Yumm!

Now, this is what plantains look like before they are fried. To make tostones, they have to be completely green. If they have a bit of yellow is totally fine- you will just end up with a toston that tastes a bit sweet. 


Use a sharp knife to cut off the tips and then slice the tough skin open. With the same knife, push the skin away from the goodness inside until the plantain is uncovered. You would think that these beauties peel just like a ripe banana would. Nope. The skin actually sticks to the inside a bit and you need the knife to separate it. But it is not a hard process at all!


Then you cut them into rounds of about 1/2 inch. Some people cut them a little thicker to end up with a bigger toston. If you do that you may have to use more oil and fry them a bit longer to get them to soften up before smashing. 

As I said before, they need to be partially fried before the smashing step. I cook them for a few minutes on both sides at medium temperature. Some people use a sauce pan and add plenty oil to cover them. I try to avoid using too much oil, so I just use a regular skillet with enough oil to cover the bottom of the pan, then I let them cook on both sides until they soften up a bit. Do not let them 
crisp up at this stage.

When a fork can be inserted into them, they are ready to be flattened! Put a bit of oil in the center of the circle (just use a spoon a get some from the skillet) and on the lid, then smash away. Remove the toston with a fork and throw back in the oil. Continue with the same process until finished. When they look crisp and golden (use a spatula to turn them half way), remove from the oil and have a plate prepared with a couple paper towels to drain the tostones. Sprinkle with a generous amount of salt. Serve with rice and beans or eat them as a snack. Enjoy!

I honestly had no intentions to write a post about plantains. Lol! I am glad that I did, though. 


Monday, April 6, 2015

Padded Headboards

These gorgeous padded headboards I put together for my boys. They are very simple to make. There are a lot of tutorials online that do a good job with the step by step instructions. If you still have questions about this let me know!

Photo

Photo

Photo

Rebecca Trunk - Finally finished!

Hello friends! For the longest time I was wanting to build a blanket storage trunk. I was getting tired of seeing all my blankets piled up in a corner on this half broken basket! 

 Thanks to the free plans provided by Ana White and many other DIYers I adjusted the measurements and made a copy cat version of the Rebecca Trunk from Pottery Barn. Here is a picture of the original trunk:


 So, what do you think? Are you tempted to build your own? You may find the free plans through the Shanty2Chic website or the Ana White website.

Please contact me if you have any questions about this project!