Hello friends! It’s been a while since I have shared with you another one of my easy projects, so here I am, ready to make your day! These shutters are super simple to make, and even though I don’t have pictures of every single step, I don’t think you will need them. You can make these in 1/2 a day, and once you install them on your bare window and see the transformation, you will wonder why in the world you waited so long to do this! Ready to tackle this? Let’s do it!
Materials needed:
Wood (cedar or pine work fine) – 1 inch thick X 6 inches wide boards. Make sure they are nice and straight.
Nails
Wood glue
Miter saw (or just get them cut at Lowes or Home Depot)
Hinges (optional – link below)
First, cut 6 boards (three for each panel) the length of the window (mine was 60 inches tall). Then cut 4 horizontal pieces (2 for each panel) that are the exact width of what your finished panel will be. To determine the width of your panels, just measure the width of your window and divide by half. My window was 36 inches wide, so each one of my panels ended up being about 18 inches wide. Once I had everything cut I gave all the pieces a quick sanding to make them nice and smooth.

Make sure you measure each board since the 6 inch wide measurement is closer to 5 3/4 inches than it is to 6 inches. Once you know exactly how wide your planks are you can then determine the space between the boards, which, along with the measured width of the three boards should match the length of the two horizontal pieces.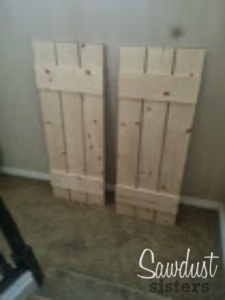 Glue the top horizontal piece with wood glue and place some heavy books on it to keep it from sliding (use clamps if you already have some). Do the same thing with the bottom horizontal piece. The distance from the top and the bottom can vary–you can place the horizontal pieces on the boards before gluing them and then step back to see if it looks good to you. If not, adjust the measurement until satisfied. Keep in mind that the smaller the length of the panel the smaller the distance from the top and the bottom to the horizontal pieces. Mine were about 6 inches from the top and the bottom.
 Glue the top horizontal piece with wood glue and place some heavy books on it to keep it from sliding (use clamps if you already have some). Do the same thing with the bottom horizontal piece. The distance from the top and the bottom can vary–you can place the horizontal pieces on the boards before gluing them and then step back to see if it looks good to you. If not, adjust the measurement until satisfied. Keep in mind that the smaller the length of the panel the smaller the distance from the top and the bottom to the horizontal pieces. Mine were about 6 inches from the top and the bottom.
Once the glue dries you can turn your shutters over and nail them from the back for extra sturdiness. Use nails that are no longer than 1 3/4 inches long to make sure everything is well attached. Or you may use an electric drill and screws instead. The reason why I wait until the glue is semi dry to do this step is to keep the boards from sliding on me while I am trying to drill into them. But at the time I did not have any clamps to hold the wood steady. If you do have clamps, you can apply the glue, set the wood pieces where they need to be, clamp them, and then screw from behind.
I used a dark walnut stain from minwax that is gel based. It glides on like paint. It is one of my favorite colors for staining wood. Then I brushed a semi gloss polyurethane on the front and back since these shutters are facing south and will get a lot of sun, rain and snow. I am planning on doing the polyurethane once a year to keep the wood in the best condition possible and for the longest time.
Talking about wood, make sure you get good quality wood. Cedar is a great option if you want to spend a little more. I bought pine to keep everything low cost. I will let you know how they are holding up after one year of facing the elements! =-)
The hardware that I used I bought from amazon. They are actually plastic hinges! Again, I wanted to spend the least amount of money, and wrought iron hinges, although beautiful, were out of my budget. These ones worked out great and they dressed up the shutters nicely.

As far as hanging the shutters on the brick wall, that is one thing I did not do. We have a friend who is a contractor and he had the right drill and screws to get it all done perfectly. He spaced the shutters about an inch from the window. I wish I could tell you how to do it yourself but I have no clue! Lol!

Do you have any bare windows that need some dressing up? I hope you liked this simple project and that you are now pumped up to build some yourself. If there is anything you want more detail about please let me know!
Thanks for stopping by. -Beverly
No comments:
Post a Comment